Getting Started with OpenBay Pro
Installing OpenBay Pro
OpenCart 3.0.3.6 and later
Unlike with earlier versions of OpenCart, OpenBay Pro for OpenCart 3.0.3.6 (and later) will need to be uploaded to your server before it can be installed. Please follow the 5-step guide below to upload the OpenBay Pro files and install the modification file. Should you find this process complicated or just want peace of mind that everything will be set up correctly, please get in touch as we'll be happy to upload and install OpenBay Pro for you, free of charge. Simply open a support ticket (see Creating a Support Ticket) with this request and we'll be in touch.
Uploading and Installing OpenBay Pro on OpenCart 3.0.3.6 and later
1 - Backup Your Website
Before uploading OpenBay Pro to your website, you should make sure you have a recent backup.
2 - Upload the OpenBay Pro Files
- Click OBP_for_OC3036_and_later to download the OpenBay Pro zip file to your computer.
- Unzip the downloaded zip file.
- Open your FTP client. If you don't have one, you can download FileZilla, a free FTP client available for Windows, the Mac, and Linux.
- Log into your FTP client, enter your server's Host, Username and Password and click Connect. If you don't have these credentials, contact your hosting provider as they will be happy to provide these. Once connected, you will see a left and right panel. The left panel is your Local site where your computer files are stored and the right panel is the Remote site where your website server's files are stored.
- From the Remote site (right panel) navigate to your OpenCart website's root folder, which is usually located in a folder called public_html or www. If you're in the right place, you will see folders named admin, catalog, and system. This is where your OpenBay Pro files will be uploaded to.
- From your Local site (left panel), navigate to the OpenBay Pro folder you downloaded/unzipped to earlier and click inside to find a folder named upload. Click inside this folder and you will see folders named admin, catalog, and system. Drag these three folders to the Remote site (right panel) - making sure to overwrite contents wherever prompted. As soon as these folders/files have uploaded, you are ready to install the modification file.
3 - Install the OpenBay Pro Modification File
- Click OBP_MOD_for_OC3036_and_later to download the modification OCMOD zip file to your computer.
- Log into the administration area of your OpenCart website.
- Navigate to Extensions > Installer.
- Click the Upload button and select the downloaded ocmod.zip file - you should receive a Success message.
- Navigate to Extensions > Modifications.
- Click the blue Refresh button at the top-right of the page.
4 - Install OpenBay Pro
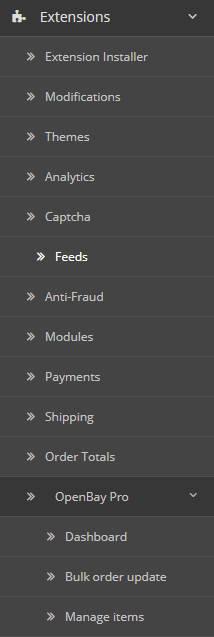
- Select Extensions, Extensions from the main navigation menu (left-hand side).
- Select Feeds from the Choose the extension type dropdown list.
- Click the green Install button on the OpenBay Pro row.
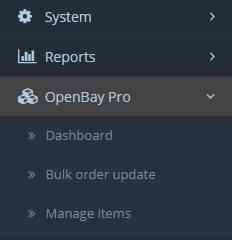
- Refresh the page by pressing F5 on your keyboard and you will see OpenBay Pro appear in the main menu on the left-hand side.
5 - Run the Manual Update Patch
- Navigate to OpenBay Pro > Dashboard.
- Click the Manage button.
- Click the Manual Update Patch button.
The installation of OpenBay Pro on your website is now complete. To learn how to use OpenBay Pro with your website, please see our OpenBay Pro Knowledge base.
Having problems?
If you're having problems installing OpenBay Pro on your OpenCart website, or have any questions about OpenBay Pro, please open a support ticket (see Creating a Support Ticket) with details of your problem or query and we'll be in touch.
OpenCart versions 2.3 to 3.0.3.5
- Log into your OpenCart admin.
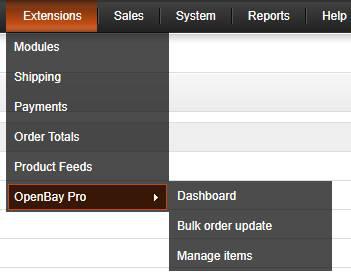
- From the main navigation menu on the left-hand side select Extensions and then Extensions again.
- From the Choose the extension type dropdown list, select Feeds.
- On the OpenBay Pro row click the green Install button.
- Refresh the page by pressing F5 and you will see OpenBay Pro appear on the main navigation menu on the left-hand side as follows.
OpenCart versions 2.0 to 2.2
- Log into your OpenCart admin.
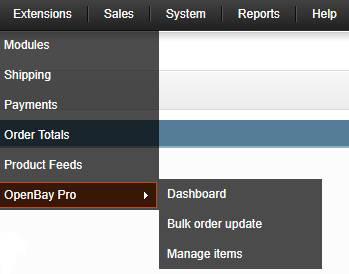
- From the main navigation menu on the left-hand side select Extensions and then Feeds.
- On the OpenBay Pro row click the green Install button.
- You will see OpenBay Pro appear under Extensions on the main navigation menu on the left-hand side as follows.
OpenCart versions 1.5.6 to 1.5.6.4
- Log into your OpenCart admin.
- From the navigation menu at the top select Extensions and then Modules.
- On the OpenBay Pro row click Install.
- You will see OpenBay Pro appear under Extensions in the navigation menu at the top as follows.
OpenCart versions 1.5.1.3 to 1.5.5.1
Installing OpenBay Pro on OpenCart 1.5.1.3 to 1.5.5.1 is not as simple as with more recent versions but should be straightforward for most. You need to be familiar with FTP as files need uploading to the OpenCart root directory. The full procedure is detailed below but please be aware that should you find the following procedure confusing or intimidating, or just want peace of mind that everything will be set up correctly, we do offer an OpenBay Pro installation service – so you can leave the hard work to us.
Using FTP
To upload the required files you need an FTP client such as FileZilla (available for Mac and PC). You will also need access to your server through FTP using your server address, username, and password – these should have been provided to you by your hosting provider.
After connecting to your server, you need to navigate to your OpenCart main directory (this contains your admin, catalog and system folders). You will need to drag the required folders from your local machine to this location.
1 - Backup Your Website
Before installing OpenBay Pro on OpenCart versions 1.5.1.3 to 1.5.5.1 you should first backup your whole eCommerce store including the database.
2 - vQmod – uploading and installing vQmod
OpenBay Pro requires vQmod for OpenCart versions 1.5.1.3 to 1.5.5.1. Before attempting to install vQmod, you should check if it is already installed. To do this, type /vqmod/install after your website domain name in the URL of your browser. For example:
www.mywebsite.com/vqmod/install
This URL will instruct your web server to look for vQmod and install it if not already installed. One of several messages will appear as follows.
VQMOD ALREADY INSTALLED!
You already have vQmod installed - proceed to Step 3.
VQMOD HAS BEEN INSTALLED ON YOUR SYSTEM!
This message means vQmod was found in the root of your OpenCart website but had not previously been installed. It has now just been successfully installed - proceed to Step 3.
Object not found!
If this message appears, or similar, it means that vQmod could not be found. You will need to upload vQmod to the root of your OpenCart store as follows.
- Go to the vQmod download page to download the latest version of vQmod with OpenCart in the title.
- Extract the downloaded vQmod zip folder.
- The extracted folder will contain a folder called vqmod. Using an FTP client such as FileZilla, drag this folder to the root of your OpenCart store.
- Install vQmod by typing /vqmod/install after your website domain name in the URL of your browser. For example:
www.mywebsite.com/vqmod/install
You should receive the following message stating that vQmod has been successfully installed.
VQMOD HAS BEEN INSTALLED ON YOUR SYSTEM!
3 - Uploading and Installing OpenBay Pro
- Go to the OpenBay Pro shop to download OpenBay Pro. You will need to register for an OpenBay Pro account during this process.
- From your OpenBay account, click My Account followed by Downloads.
- Find the OpenBay Pro download for your version of OpenCart, 1.5.1.3 to 1.5.5.1, and click Download.
- Extract the downloaded OpenBay Pro zip folder.
- The extracted folder will contain the folder upload. Inside this will be the folders admin, catalog, system, and vqmod. Using an FTP client such as FileZilla, drag these four folders to the root of your OpenCart store.
4 - Setting Your Permissions
Now that the OpenBay Pro module files have been uploaded, you need to modify the permissions for the administration user so that you can install and setup the module.
- Log in to your OpenCart administration area.
- Navigate to System > Users > User Groups.
- Click on the user that you want to modify (usually Top Administrator).
- Tick the boxes that relate to OpenBay Pro in both Access Permissions and Modify Permissions.
- Click Save.
Depending on which version of OpenCart you are using, OpenBay Pro may now be visible on your store under Extensions > OpenBay Pro. If not, you will need to install the module as follows.
- Navigate to Extensions > Modules.
- Find module name OpenBay Pro and click Install.
You will find OpenBay Pro under Extensions > OpenBay Pro.
5 - Run the Patch
To complete the OpenBay Pro installation, you will need to run the manual update patch. Navigate to Extensions > OpenBay Pro > Dashboard, click the Manage button followed by the Run patch button. A message box should appear stating the patch has been applied.
Updating OpenBay Pro
To ensure you have the latest update and new features etc, you should keep your OpenBay Pro module up to date. To see if you already have the latest version, log into your website admin and navigate to OpenBay Pro > Dashboard, where you will see the version information in the top right of the page.

There are two ways of updating OpenBay Pro, using the built-in update system (which we recommend as it's the quickest and easiest method) and manually through FTP (which can be used if the built-in update system fails). Both methods are detailed below.
Using the built-in update system
To update your OpenBay Pro module using the built-in update system (called Easy 1 click update, or Easy updater on older OpenCart versions), proceed as follows.
Warning - make sure you have a full backup before continuing
- Log into your website admin.
- Navigate to OpenBay Pro > Dashboard.
- Click the Manage button.
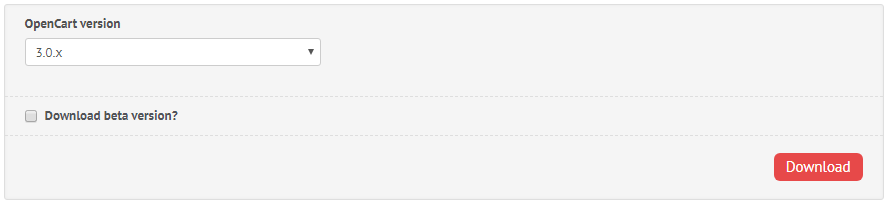
- You will now be on the Software Updates page.
- Leave the Use beta version set to No (unless advised otherwise by OpenBay Pro Support).
- Click the Update button.

A blue progress bar will appear as follows.

When green, the update is complete.

Your website should now have the latest version of OpenBay Pro. You can verify this by navigating to OpenBay Pro > Dashboard, where you will see the version information in the top right of the page.

Updating manually (through FTP)
To update your OpenBay Pro module manually through FTP, proceed as follows.
Warning - make sure you have a full backup before continuing
- Log into your OpenBay Pro Account
- Select your OpenCart version from the list.
- Leave Download beta version unticked (unless advised otherwise by OpenBay Pro Support).
- Click the Download button.
- Unzip the downloaded folder.
- Login to an FTP client. If you don't have an FTP client on your computer, you can download FileZilla, a free FTP client available for Windows, the Mac, and Linux.
- Enter your server's Host, Username and Password and click Connect. If you don't have these details, contact your hosting provider as they will be happy to provide this information.
- Once connected, you should see two panels, a left panel and a right panel. The left panel is your local site panel where your computer files are stored and the right panel is the remote site panel where your website server's files are stored.
- On the remote site (right panel), navigate to your OpenCart website's root folder (usually inside a folder called public_html or www). You should see admin, catalog, and system folders here and this is where your OpenBay Pro update files will go.
- On your local site (left panel), navigate to the OpenBay Pro folder you downloaded/unzipped earlier. Click inside this folder and you should see a folder named upload. Click inside there and you should see 3 folders, admin, catalog, and system. (Note - if you are using an OpenCart version prior to 1.5.6, you will also see a vqmod folder).
- You are now ready to upload the OpenBay Pro update files to your server. Drag the admin, catalog, and system folders (plus vqmod if applicable) from your local site (left panel) to the remote site (right panel) making sure to overwrite contents when prompted.
- When the upload is complete, you will need to run a manual update patch, which is a simple process. Log into your OpenCart admin and navigate to OpenBay Pro > Dashboard. Click the Manage button and select the Patch tab. Click the Patch button and you should see a Patch has been applied message appear. Please note that this patch process is only required with the manual update process.

You should now have the latest version of OpenBay Pro. To verify this, navigate to OpenBay Pro > Dashboard, where you will see the version information in the top right of the page.

Installation/Updating Problems
Having problems installing or updating OpenBay Pro? If so, please don't hesitate to contact us as we'll be happy to explain the installation and/or updating procedures in more detail or help with any queries you have.
Please also note that we offer a paid OpenBay Pro Installation and Update service should you have problems updating your module or would like us to perform this service for you.
Customer support service by UserEcho
